


Leaked: Intel’s 14mm Skyline Platform to Feature DDR4, PCIe 4.0 & SATA Express
Some leaks are really fun to see, especially when they shed...

Asus has made motherboards for probably as long as I can remember. I’m not saying that it’s all I have used since I have used a whole host of boards over the years but watching the ROG line from ASUS come into being and evolve into what it is today has been a show worth watching. The ROG line started as a hardcore gaming brand and since then has headed down a much more extreme path as many high end LN2 benchmarking enthusiasts choose the ROG line almost exclusively due to the features and overclocking ability built into them.
ROG has always had a performance based background but for a long time ASUS knew that there were far more gamers than there were benchmarkers and to this day this holds true. One thing I think ASUS learned along the way though is that benchmarkers are gamers as well and they tend to like some of the same features and many can be shared on both a gaming and benchmarking motherboard. This in itself opened them up to pushing for even more performance and higher performance models as benchmarking began to pick up steam. During all of this ASUS has not forgotten its gaming roots and as you will see with the Maximus V Formula it has some awesome gaming features just waiting to enhance your gaming experience.

ASUS always has multiple model offerings in the ROG range for Intel based boards and Z77 is no different. First up we had the Maximus V Gene and it was pure awesome for both performance and features. Today it goes a step further with a full ATX board and some serious hardware to differentiate itself.
Some of the cool new additions include a new cooler design for the CPU power circuits which integrates a liquid cooling pipe called Fusion Thermo. Also audio has not been neglected with the next iteration of the SupremeFX line in the SupremeFX IV offering. Add to this some of the Wi-Fi inclusions and the ability to run an mSATA SSD and you can see this is one hell of a board and a force to be reckoned with.
The inclusion of the THUNDERFX module is curious as now it seems ASUS is engaging not just PC gaming but starting the engagement of console or “Other” gaming devices. The THUNDERFX module allows connectivity of a headset to multiple devices to allow great interchangeability without worrying about multiple headsets or moving headsets from system to system. This also coincides with what Microsoft is doing with Windows 8 by creating a uniform interface across all Microsoft based devices.
This board comes to the playground packing some serious hardware and what looks like to be a serious punch. All other boards need be warned as this may be the new bully of the schoolyard. Follow along as we dig into the Maximus V Formula / THUNDERFX and see if it holds merit to its present $359.99 street price
Here we see the THUNDERFX device and man is it cool. What’s strange is it carries the ASUS Stealthy style you see on the heatsinks and other components of the ASUS motherboards but on the external device. We will look at this a lil bit later in the review, for now lets move along.
Maximus V Formula Basic Features
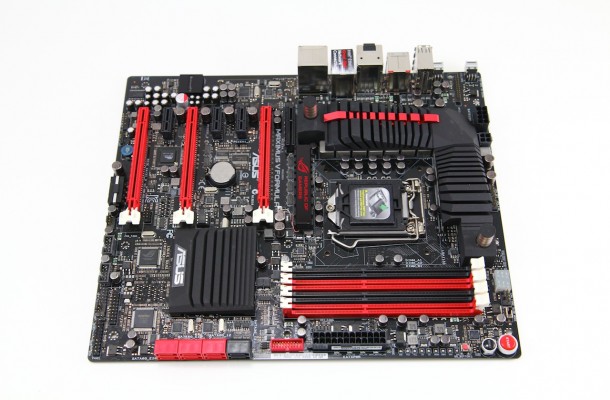
The Maximus V Formula while being a Z77 is a totally different animal than the previous Maximus V Gene board. First of all it’s a full ATX height which helps with larger GPU fitment but also means you need a mid tower at least. One thing to note is that the board is listed as Extended ATX size which can be misinterpreted as EATX which is normally much wider, but the reason it lists extended for its spec is because it uses standard ATX screw mounting but it is slightly wider than a standard ATX offering. The total width is 10.1” wide which is not too far over standard and even on chassis that do not list extended ATX as supported I have been able to fit it but its definitely worth the measuring if you’re not sure. Also don’t forget that there are SATA cables that will need to plug in at the board edge so take account for those to avoid clearance issues there as well.

The layout is something I always try to pay special attention to as whether its myself or one of my guys building the next amazing gaming rig to show off to you guys, one of the hardest parts is always cable management and routing. This can plain and simple be a pain in the ass at times and with the connectors being located close to the very edge of the board this allows the cables to simply be looped over and tucked away for a nice pretty system build. Any of you who have seen my builds knows that I love to have an awesome and tidy looking setup so in the case of cable management optimization I have to say this is a huge plus.


Here is some of the stuff that comes in the box to help with setup. The Accessories list is vast and all encompassing. I’m not going to list every item as many you can tell what they are by just seeing them. There are some specialized components for the ThunderFX component such as a XBOX connector to port in game audio and communication, Wi-Fi Pass through cables as the Antennae are external and they pass through the IO shield.

The DIMM slots are the same as I have seen on every other Z77, which is a standard 4-slot design; nothing ventured nothing gained there the real point of interest would be the T Topology design which is new for ASUS boards and it is a trace layout they have come up with which is supposed to cause much better performance potential through the more efficient T topology design. Worth noting is that all ASUS Z77 boards from the top to the bottom have the T Topology design implemented. I am thinking that while this generation may be perfectly fine with current designs as memory speed gets faster and more efficient that T topology will pay off in a design generation or 2 but we will have to wait and see. The memory supported is specified to run at up to overclocked speeds of 2800 MHz but we have seen speeds in excess of 3000 made with the right modules and some serious levels of tuning.

Here is magic land or my happy place, I really hope that is not taken the wrong way, but overclocking is very fun stuff for my team and me. The CPU socket area this is really where all of the magic happens as this very spot holds so many components near and dear to my overclocking heart that it is truly scary. This area has of course the CPU socket (Cant really run very well without that) but more than that it has all of the VRM components, which is none other than ASUS, famed DIGI+ Extreme Engine II design. This is made for nothing else than pure awesomeness by the way of extremely overclockable components but also very extreme power efficiency which is something I wouldn’t expect from a performance enthusiasts board. The DIGI+ Controller is what makes it all possible. The DIGI+ controller allows for optimum power accuracy and maximum delivery for excellent overclocking performance while also allowing for optimum efficiency and power savings when under a low or no load state. The DIGI+ design allows for throttling or switching of power circuits to balance load back and forth between components which allows the components to run cooler and more efficiently.

The storage end of the equation is handled nicely with 8 total ports where you would normally expect them but only half of those come from the standard PCH. The two black ports are SATA 3G spec and from the PCH along with the first set of red ports directly next to it which are 6G and also fed by the PCH. The other 4 red ports are 6G capable ports which are fed by an ASMedia controller and one thing to note is these are meant for storage or data drives only and not for OS or installation use. Anyone in the know will notice that there are two SATA 3G ports missing that the PCH is capable of feeding well those are routed to the rear IO area in the form of a single eSATA port and also the available mSATA port on the mPCIe/mSATA combo card.
Another feature which we have covered previously is the USB BIOS flashback which allows us to flash to the newest bios with a USB thumb drive without a CPU or memory even in the system so you could be on the newest bios as soon as you open the box by just plugging in power and utilizing the USB BIOS Flashback feature which can quickly and easily have you ready to run in no time especially in cases where you otherwise may have a CPU support issue causing no post and on traditional boards would have to hunt down or borrow a compatible CPU just to get the BIOS flashed. All in all this just seems like a much easier and more user friendly solution to a long time problem.

Looking at the other side of the power components we see that the power feed for the CPU is a single 8 pin and also a 4 pin to allow for that extra nudge of amperage for the CPU should the need to go cold and fast come into play. Do not dismay if your PSU only has an 8 Pin PSU connector as I have ran a 3770K to 6.6GHz on the Maximus V Gene with the single 8 pin connector and it did just fine.

The PCIe slot layout is quite unique as for SLI use it is still limited to 2 Way but unlike the Gene board it allows for 2 Way SLI with triple slot cards. This means now that these monster cards ASUS has been releasing have a happy home in the Formula. The 2 slots can run X8 PCIe Gen 3 spec which is perfectly fine for current gen cards. Any bottlenecking seen at the highest level will still be marginal if at all from testing, but there is simply a limitation coming from the CPU as it supplies the 16 lanes. To get more you got to add a multiplexer chip and add cost.

Looking at the other side of the power components we see that the power feed for the CPU is a single 8 pin and also a 4 pin to allow for that extra nudge of amperage for the CPU should the need to go cold and fast come into play. Do not dismay if your PSU only has an 8 Pin PSU connector as I have run a 370K to 6.6GHz on the Maximus V Gene with the single 8 pin connector and it did just fine.

The lower edge of the board houses many pin headers to allow front panel connectivity, fan headers and also USB connectivity to ensure the most efficient design that will fit under a card should it cover this area from the slot above. Also here you see the standard 4 Pin PATA connector which is used for supplemental power to the slots to ensure a multi GPU setup gets plenty of juice when needed.

The lower left hand edge of the board houses the audio solution which is home to the new and heavily improved upon SupremeFX IV solution. The PCB still houses the island style design to isolate stray signal noise from reaching the audio circuit as the PCB is completely separated from the rest of the board. Highlighting is done via SMD LED’s to show off in bright red the separation of the PCB parts. Also included in the SupremeFX IV solution is an upgraded codec covered by the black led lit shield and the high power headphone amp to provide some nice clear punch to your high end gaming headphones.

The rear IO panel has some connectivity similar to what we saw on the Gene board and some that may be new.
There are many options here for connectivity and one of the most interesting being the inclusion of the mSATA/mPCIe combo card header which we will discuss shortly. The Audio has dual SPDIF ports as options but the thing of note here is the audio solution feeding the analog audio ports here which is the new SupremeFX IV solution which is supposed to be a major step forward from the SupremeFX III I had seen and used on the Maximus V Gene board. Also we notice that with Z77 there is now support for native USB 3.0 via the Intel PCH and knowing ASUS and their USB boost feature they did find a way to even improve that. Asus utilizes their USB 3.0 Boost technology to ensure that you will get the very best speeds possible for your USB 3.0 or even USB 2.0 Devices when plugged into a USB 3.0 port. One thing to note is that while Intel USB 3.0 only will support the Turbo mode for USB 3.0 boost ASUS still includes a proven performer in the ASMedia controller so that UASP supported devices can give near Thunderbolt or even exceeding Thunderbolt speeds when utilizing the correct solution such as the ASUS supplied Thermaltake BlacX 5G Dock and Corsair Force GT SSD that we received to showcase the UASP function. More info can be found on this technology here.

Here is an example of the stock speed or “Normal” performance of the ASMedia USB 3.0 controller with a high performance Runcore SSD Drive. We see about 258MB/s write and 241MB/s read for that drive which is pretty fast for an external docking solution but lets see what we can get with the ASUS USB 3.0 Boost technology.

When Switching to the UASP mode supported by the ASMedia controller we see the speed jump to a write speed of 376MB/s and reads in excess of 336MB/s which exceeds 100 MB/s by a simple software setting within the AISUITE utility. While that seems simple it definitely is something we know there is far more than meets the eye when it comes to what is done to make this work. Now lets see how the Intel USB 3.0 ports function.

Intel at default shows the same drive running a write of 278MB/s and reads of 270MB/s which tells us we have some serious performance potential here, but well stock is stock and we never leave anything alone so lets see what we can get with the Turbo mode enabled.

Here we see that the speeds jump up quite a bit here to writes of 357MB/s and reads in excess of 444MB/s which is a huge jump and we saw something even more interesting when tweaking memory speeds.
Something interesting we did see that by simply increasing memory speed from default to 2400MHz we found that the Intel controller jumped in performance to writes of up to 410MB/s and reads of 446MB/s so we have to assume that the Intel controller is caching some of its write process to the memory in some way so when it comes to performance memory we can now say that there are advantages to having that new 2000MHz+ memory kit whereas before gains from such kits would be marginal we are now at a point to where we can see real world benefits from these super high speed DIMMS

Here we see the GPU/DIMM post feature which enables users to see in the BIOS all detected GPUs and memory modules installed. This is a great tool for seeing what the board is recognizing during post which could let us know if there is a card issue or even a memory DIMM issue as it will either not show up or possibly even show an “Abnormal” state which signifies its detecting a problem with the installed component. This can especially be quite helpful when pushing memory and running into stability problems or blue screens as it can show if a module is possibly problematic.
Maximus V Formula Advanced Features
This is where we look into some of the features that make the ROG board so special and worth the extra dollars and cents to the gamer or enthusiasts out there vs. anything in the competition.

The Digi+ Extreme Engine II is a powerful force based upon some very select and powerful components. Digi+ is a design implementation for the VRM which consists of select components carefully matched to offer excellent performance. The Digi + controller is very special as it is designed to offer top level performance and efficiency via super accurate digital control, and also the efficiency is handled via special throttling techniques. The Throttling allows for power circuits to ramp up and down depending upon load demand based switching takes over which switches load back and forth between components which allows components to have less load and less heat output. This lower load and switching options result in better thermals and in turn better efficiency.
On top of all of this the selection of top end caps, MOSFETs components and chokes make up the Digi + extreme engine solution. All of these components combined make up a very powerful solution which has proven to offer some excellent performance.

ROG Connect allows remote monitoring and management of the host system via a USB attached client system used to not only monitor but even real time overclock the benchmarking system which can be a life saver if running a benchmark at the ragged edge and having the need to adjust the clock down slightly during a more stressful part of a benchmark. The ROG Connect feature also allows overclocking of the Graphics card as well so it really is an all in one solution for the most part for the ROG board and user.

Here is the card which fills that pin header we had looked at previously up on the top IO are edge. This is worth noting as it comes preinstalled with an mPCIe Wi-Fi BT 4.0 card that makes wireless network and even wireless control possible and easier. With this connectivity the amount of wiring required to setup your PC is drastically reduced. I personally like the idea that you can setup the PC with little more than a Power and display cable needed.
Also on the cards opposite end there is a mSATA port which can take any size mSATA SSD which means you can now run everything directly from this device without any cabling coming from the standard onboard SATA ports. Also and more common will likely be the usage of this mSATA port as a caching medium with a 64GB approx. SSD to use Intel SRT technology to cache a large mechanical hard drive for SSD like speeds.


The ThunderFX module is designed around the whole purpose of offering a top end audio solution to all gamers no matter if it is PC, XBOX or PS3. The box has a switch knob which allows changing from the 3 systems so that the same headset and microphone can be connected to any of these gaming systems. The device has multiple profiles with a custom profile you can custom tune for specific audio conditions. The ThunderFX device has a rated 120dB SNR which puts it above some of the top audio solutions available for PC and definitely a nice solution for consoles as well. The internal headphone amp allows for up to 300ohm headphone impedance, which means this thing, is designed for some very high end gaming headsets.

Here is the upper edge near the DIMM slots and this is where many users will be when bench testing this board as all of the overclock along with power/reset controls are found. Other items are here such as the LN2 jumper which enables LN2 mode including LN2 special profiles to give users a jump start and beginner settings to almost 6GHz when running subzero. It should be advised that the LN2 jumper should not for any reason be enabled under normal cooling or even water cooling as this mode is designed for subzero cooling and many protections that would normally keep things safe are not present in the LN2 mode. Also at this upper edge there is a switch which is for “Slow mode” and this allows a manual slowing of the CPU clock by dropping the CPU multiplier to x16 which allows for easier quick slowdown between tests which could otherwise cause a slowdown or even crashing condition at very high clocks. This can also make for easier time when pushing memory clocks as it keeps the CPU very low for easier testing of the IMC limit.

The SupremeFX IV solution is the next evolution of the SupremeFX audio solutions. SupremeFX III employed the Red line separation, which is a PCB island cut out to isolate the audio solution from the rest of the board. The SupremeFX IV solution takes this a step further with an improved audio codec which unfortunately is a little camera shy and is covered by the EMI shield to prevent stray noise from entering the audio circuit. The solution also selects top quality audio caps to ensure that clear clean and warm audio makes it to your speakers or headset. On top of all of that there is a high end audio amplifier designed to push maximum audio power for high end gaming headsets to provide superb clarity and maximum performance.

The VRM cooler is a special design which comes from many years of ROG liquid cooling implementations. ROG has had waterblocks on many of its motherboard chipset solutions dating back over many chipset series. This most recent one is a hybrid design like the rest but instead of swapping parts these 2 are one and the same as the heatpipe runs the length of the cooler with the Fusion Thermo liquid pipe running parallel to it. The Fusion Thermo per ASUS can drop temps dramatically per the test report you can see below.

Here you see that the thermal camera they use shows a much better temperature result with the liquid cooling connected. Unfortunately I do not have a thermal camera to show this result in the same way but having used liquid cooling solutions for quite some time now I can surely say that liquid cooling on the VRM will help in continuously heavy loaded conditions as the VRM can get quite warm. The Digi+ VRM definitely helps keep this heat much lower but under heavy clocking and loads it definitely can get much warmer.

Gamefirst was implemented some generations ago on ASUS boards. Gamefirst II is powered by cFos and is a traffic shaping utility which allows for more ideal network conditions for gaming or other network data packets. This allows for smoother network gameplay and better pings which can make a big difference in games heavily based on network play such as MMORPG type games. Besides that any program can be given priority to network traffic whether it be downloads or even media streaming. What this means is that while gaming priority can be lowered on downloads so that downloads can continue in the background while your network based games can still be played with optimal ping times.
Maximus V Formula Overclocking
Overclocking the Maximus V Formula was easy, as I have come to expect with ROG boards. There is a level of granularity of settings that really is hard to beat. The BIOS plays a huge part in this as there are many presets just waiting to make the task so much easier. Getting to 5GHz was not too hard with a little tuning required but the real surprise was the fact that we were able to accomplish complete stability at 5GHz at .02V lower than on the Maximus V Gene.
")
Working with ROG boards as you can see above in LN2 mode with some LN2 it can be seen that there is some serious tuning and tweaking potential just waiting for the right user with the right cooling equipment. We have seen many users with much more capable chips hitting in excess of 7GHz but lets face it without that kind of golden chip there is no level of tuning that is going to get you past a limit on the chip level. Overall if you are looking for the availability to overclock and do it well the ASUS Maximus V Formula is one hell of a great start.
Maximus V Formula BIOS Features
The BIOS of the Maximus V Formula is similar to that which we saw on the Maximus V Gene. The amazing level of tweakability is simply industry leading as I have yet to find a board which has this level of adjustments. The memory presets in the BIOS are nothing short of astonishing as depending upon the IC your DIMMS use this can be an excellent tuning tool
The board has several presets including basic overclocking profiles such as the standard “Gamers’ OC” which sets a 4.8GHz overclock. This is the only profile, however with LN@ mode enabled via jumper 2 more BIOS profiles show up for extreme benchmarking with subzero temps. By profile alone the board can reach just shy of 6GHz at over 5.9GHz very easily. This gives a good starting point for anyone who may not know exactly where to start or maybe is good with LN2 but simply has not had much time with Ivy Bridge to bench.
Voltage scaling is a little different on this board as the Gene had a vCore limit of 1.92V whereas this board in LN2 mode can scale much higher well over 2V which allows for even more extreme overclocking such as the recent ASUS Absolute Zero event where they were benchmarking with liquid helium at -230C temps and using more than 2.1V vCore to hit over 7GHz.
Maximus V Formula Test Setup

Maximus V Formula Performance Results

Maximus V Formula Final Thoughts
The Maximus V formula is a powerful board with both gaming and overclocking as key drivers for its technology and innovation. The SupremeFX IV solution provides a very good strong audio offering which allows for more gaming realism and depth to the gaming environment. The Gamefirst II solution adds even more to the gaming feel as it carries with it the promise of the possibility of improved online gaming performance via better online ping times. This will count when trying to make that all important head-shot without getting yourself killed in the process due to lag.
The Fusion thermo cooling solution ensures that the VRM components can be kept at much cooler temperatures, which in turn will offer better efficiency and performance and therefore longer life of the board. The mPCIe/mSATA card come preinstalled with an mPCIe WiFi/BT4.0 card that enables wireless connectivity of network and control devices. The board overclocks very well and has plenty of gaming hardware onboard. This board is built for the ultimate gaming performance and it delivers with no compromise. Spending your money on PC hardware is always a big choice for the serious user as lets be honest no one wants to have disassemble their mean machine due to faulty components. ASUS is world renowned for their products and 9 times out of ten they make something that will not only appeal to the enthusiasts inside us, but also one that will work for years on end as your workhorse.


Some leaks are really fun to see, especially when they shed...

Canon recently announced it's latest DSLR, the 70D, which is the...


The GeForce GTX 760 Gets Unleashed Another week means yet another launch...

With yesterdays launch of the new GeForce GTX 760, not...
Pingback: yr0weiuo
Pingback: nachos dips
Pingback: vädret
Pingback: pre owned cars in madison tn
Pingback: pre owned cars in madison tn
Pingback: pre owned cars in madison tn
Pingback: buy here pay here in madison tn
Pingback: buy here pay here in madison tn
Pingback: buy here pay here in madison tn
Pingback: pre owned cars in madison tn
Pingback: pre owned cars in madison tn
Pingback: used cars in madison tn
Pingback: buy here pay here in madison tn
Pingback: used cars in madison tn
Pingback: pre owned cars in madison tn
Pingback: pre owned cars in madison tn
Pingback: golfpaket
Pingback: seo in nashville
Pingback: web marketing in nashville
Pingback: internet marketing in nashville
Pingback: internet marketing in nashville
Pingback: internet marketing in nashville
Pingback: johnny
Pingback: golfpaket
Pingback: scam host
Pingback: hostgator
Pingback: tes c789
Pingback: tesc 789
Pingback: seo in Nashville
Pingback: Madison tn used cars
Pingback: Unternehmensberatung
Pingback: private investigating in Nashville
Pingback: private investigating in Nashville
Pingback: Nashville private investigating
Pingback: covert surveillance in Nashville
Pingback: Nashville tint shops
Pingback: Nashville car audio
Pingback: Mark Winkle
Pingback: download free hd wallpapers
Pingback: download free hd wallpapers
Pingback: beautiful hd wallpapers
Pingback: download free hd wallpapers
Pingback: Sherburne local business directory
Pingback: digital art tutorials
Pingback: Big Lake community news
Pingback: best high definition wallpaper
Pingback: best graphic design tutorials
Pingback: Sherburne Area News
Pingback: Big Lake community news
Pingback: hand-edited directory listings
Pingback: Teen XXX
Pingback: แทงบอลออนไลน์
Pingback: Advance America Pay Day Loans
Pingback: แทงบอลออนไลน์
Pingback: go here
Pingback: คอนโดเอแบค
Pingback: the Aromhuset Classic Cola Soda Concentrate
Pingback: product that may interest you
Pingback: regenerative thermal oxidizer
Pingback: web design in Nashville
Pingback: Nashville web marketing
Pingback: seo in Nashville
Pingback: Sparkling water flavour info
Pingback: Вопросы по скачиванию и раздаче
Pingback: แทงบอลออนไลน์
Pingback: Dominga Zuchelkowski
Pingback: distilling recipes
Pingback: Waste-King
Pingback: Madison tn used truck
Pingback: webpage
Pingback: instant payday loans
Pingback: vigrx plus
Pingback: car sales in Madison tn
Pingback: Madison tn used cars
Pingback: Исторические
Pingback: other
Pingback: Наука, техника
Pingback: site web
Pingback: Bryant Toombs
Pingback: visit
Pingback: the Aromhuset Classic Cola Soda Concentrate
Pingback: car upholstery in Nashville
Pingback: more info
Pingback: mobile money code
Pingback: car interior in Nashville
Pingback: cheap driving lessons in maidstone
Pingback: video review of mobile money code
Pingback: home brewing recipes
Pingback: Erotica
Pingback: Учебники, справочники, энциклопедии
Pingback: След
Pingback: distilling definition
Pingback: go here
Pingback: my blog
Pingback: buy here pay here in Madison tn
Pingback: uzdatnianie wody
Pingback: Madison tn used cars
Pingback: 500 fast cash
Pingback: my blog
Pingback: buy here pay here in Madison tn
Pingback: My website
Pingback: home
Pingback: payday loans las vegas
Pingback: hd teen porn
Pingback: hd teen porn
Pingback: click
Pingback: visit
Pingback: cash advance
Pingback: cash advance las vegas
Pingback: females
Pingback: cash advance loans
Pingback: heels
Pingback: payday loans dallas
Pingback: online payday loans
Pingback: online payday loan
Pingback: fixing iphone screen melbourne
Pingback: payday loans online
Pingback: Hotele w Paryżu
Pingback: American Musical and Dramatic Academy acting classes
Pingback: cheap freshwater pearls
Pingback: free bee removal beeremoval dallas
Pingback: beeremovalspecialist.com beehive
Pingback: www.beesafepestcontrol.com
Pingback: bmw lights online www.bimmian.com
Pingback: http://www.copartdirect.com
Pingback: commercial property CurbStreet
Pingback: www.desiredpearls.com pearl necklaces
Pingback: eaglecreek.com
Pingback: exploretalent.net
Pingback: www.freshreputation.com
Pingback: funtasticdental.com
Pingback: Check These Guys Out
Pingback: proautoguard.com buy extended warranty
Pingback: green smoothie probiotic cleansing diet
Pingback: rosland capital
Pingback: www.steveclarksondreammaker.com qb camp
Pingback: more info
Pingback: strut masters
Pingback: browns mensland uniforms
Pingback: vanessa nicole jewel
Pingback: venturavacuum repair
Pingback: women
Pingback: clothing
Pingback: hermes handbags
Pingback: heels
Pingback: payday loans st louis mo
Pingback: Click here
Pingback: fence installer
Pingback: Tips for charity fundraising
Pingback: payday loans direct lender
Pingback: total hair regrowth testimonials
Pingback: cash advance houston
Pingback: hypnosis
Pingback: nigeria property market
Pingback: heart rate monitor
Pingback: Property Valuers
Pingback: human healthy vending franchise
Pingback: internet marketing
Pingback: junk my car
Pingback: possible income
Pingback: get your ex back from
Pingback: diy concrete
Pingback: игра престолов скачать торрент
Pingback: Corporate website
Pingback: Locksmith OKC
Pingback: Executive Transportation Trumbull CT
Pingback: vetement mode
Pingback: More hints
Pingback: that site
Pingback: Metal Temizliği
Pingback: here.
Pingback: Louis Vuitton outlet
Pingback: read
Pingback: Pearls Necklace
Pingback: Rio Meek
Pingback: footwear
Pingback: footwear
Pingback: African Sermons
Pingback: stock brokerage platform compared
Pingback: corner computer desks
Pingback: julia
Pingback: car upholstery Nashville
Pingback: white label online casino
Pingback: Nashville car audio
Pingback: custom car audio Nashville tn
Pingback: car audio Nashville
Pingback: Nashville car audio
Pingback: click here
Pingback: click here to read
Pingback: Madison used cars
Pingback: auto financing Madison tn
Pingback: car dealerships Madison tn
Pingback: car lots Madison tn
Pingback: buy here pay here
Pingback: Nashville private investigation
Pingback: payday loans houston
Pingback: Ruby Airgram
Pingback: car alarms in Nashville
Pingback: Nashville car stereo installation
Pingback: Nashville car stereo installation
Pingback: car radio installation Nashville tn
Pingback: If it's Adult, Naughty, and Fun! You'll find it here!
Pingback: payday loans houston
Pingback: surveillance in Nashville
Pingback: Nashville pi
Pingback: Nashville private investigators
Pingback: male impotance
Pingback: used car financing
Pingback: ed exercises
Pingback: payday loan lenders
Pingback: here
Pingback: window tint in Nashville
Pingback: fast cash loans
Pingback: sexual performance anxiety treatment
Pingback: causes diabetes and impotence
Pingback: diabetes and erectile dysfunction treatment
Pingback: Dog Diabetes: What Your own Dog Can And Can’t Consume
Pingback: Audyty energetyczne
Pingback: us fast cash
Pingback: sexual performance anxiety treatment
Pingback: katalog firm
Pingback: natural remedies for impotence erectile dysfunction
Pingback: bad credit loans
Pingback: payday advance
Pingback: strap ons
Pingback: szrctgfyfrseshgjgyftre
Pingback: 25th wedding anniversary gift ideas
Pingback: apartments for rent miami beach florida
Pingback: go to this web-site
Pingback: muinuhbytrfcexyuhuigt
Pingback: commercial cleaning in Nashville
Pingback: Nashville janitorial
Pingback: how to get money fast
Pingback: http://iherbcouponcodex.com
Pingback: ctrctvuybuininubbuy
Pingback: Nashville office cleaning
Pingback: industrial cleaning in Nashville
Pingback: Nashville janitorial
Pingback: widbury music amplifiers
Pingback: lessons in chinese
Pingback: webdesign emmen
Pingback: car interior in Nashville
Pingback: Nashville car tint
Pingback: Nashville car interior
Pingback: auto customizing in Nashville
Pingback: the paleo diet for athletes
Pingback: how long does unemployment last
Pingback: Download Apple softwares
Pingback: buy erhu
Pingback: doctors note
Pingback: bookmarking sites
Pingback: Backlink Checker Google
Pingback: click here
Pingback: kinds of fungi
Pingback: tonometr omron.
Pingback: Kupite tonometr sebe i vashim blizkim.
Pingback: More Info
Pingback: annual free credit report score
Pingback: URL
Pingback: free credit report and scores
Pingback: silicone sheet
Pingback: commercial cleaning in Nashville
Pingback: Healcare reform
Pingback: https://twitter.com/NursenaAkcan
Pingback: loans with bad credit
Pingback: click here
Pingback: DACHPLATTEN FENSTER GARTEN ZAUN
Pingback: christian louboutin pigalle
Pingback: emergency preparedness
Pingback: Video Production London
Pingback: bajaj finserv bangalore
Pingback: en iyi yabanci hosting
Pingback: global system solutions chris webster
Pingback: https://mobile.twitter.com/Nurse_Aksu
Pingback: Footwear
Pingback: Kupite tonometr sebe i vashim blizkim.
Pingback: car tinting in Nashville
Pingback: Nashville car upholstery
Pingback: ragdoll
Pingback: tonometr CS.
Pingback: houston texas
Pingback: personal injury lawyer
Pingback: Kupite tonometr sebe i vashim blizkim.
Pingback: glaskugeln
Pingback: banana republic credit card
Pingback: Check this
Pingback: seo solutions
Pingback: سعودي كول
Pingback: green label network
Pingback: Nashville window tint
Pingback: tint shops in nashville
Pingback: Nashville tint shops
Pingback: my site
Pingback: سعودي كول
Pingback: سعودي انحراف
Pingback: what are angel readings
Pingback: cheap seo service
Pingback: tonometr mehanicheskij - Riester.
Pingback: buy garcinia cambogia
Pingback: מכירת דירה
Pingback: wicked lasers
Pingback: Jared Leon
Pingback: wicked lasers
Pingback: Madison tn car dealership
Pingback: wicked lasers
Pingback: Kupit' tonometr And.
Pingback: AmateurCommunity Erfahrung
Pingback: Little, avtomaticheskij tonometr s pamjat'ju na 30 izmerenij.
Pingback: Get Google Followers
Pingback: tonometr mehanicheskij - Riester.
Pingback: seo service
Pingback: generic klonopin
Pingback: car wheels in Nashville
Pingback: buy cheap twitter followers
Pingback: Buy GooglePlus
Pingback: http://www.seousa.pro/buy-google-plus-for-boosting-business-performance/
Pingback: bouteille personnalisee
Pingback: mis sold ppi ge capital
Pingback: buy twitter followers
Pingback: forklift hire melbourne
Pingback: como salio boca
Pingback: conjugated linoleic acid reviews
Pingback: karmaloop
Pingback: full coverage car insurance
Pingback: You Could Do To Acquire Real Twitter Followers buy twitter followers
Pingback: Get GooglePlus Ones
Pingback: https://youtube.com/watch?v=0q-SKmb_QBg
Pingback: find this
Pingback: https://www.youtube.com/watch?v=0q-SKmb_QBg
Pingback: escorts ts tranny
Pingback: Improve GooglePlus Circles
Pingback: funny videos
Pingback: adult webcams
Pingback: kabbee
Pingback: Geschiedenis
Pingback: ariat boots
Pingback: backyard aquaponics
Pingback: http://downloadgamev.com/video/IBsqMV4Pymc/the-samsung-galaxy-note-is-a-game-console-coldfustion/+video+
Pingback: improve google ranking
Pingback: Pregnant
Pingback: Frederick
Pingback: listen to this podcast
Pingback: Adhocspace Conference Room
Pingback: Veer
Pingback: house cleaning frisco tx
Pingback: roku
Pingback: Google + Ones
Pingback: event management malaysia
Pingback: pattaya dental
Pingback: jmijgbuiftryjgjkftyfyt
Pingback: Rancho Cucamonga Dog Bite Attorney
Pingback: O2
Pingback: http://buckeyeswild.com/blogs/user/lazarobell8
Pingback: nude chat
Pingback: bail bonds new jersey
Pingback: http://sustainabilitymarket.in/index.php?do=/blog/4955/marketing-your-business-with-google-and/
Pingback: Adzija Markicic
Pingback: custom 1911 grips
Pingback: Get GooglePlus Ones
Pingback: buy instagram followers
Pingback: quick weight loss center supplements
Pingback: serveriu nuoma
Pingback: Read More
Pingback: flooring blog
Pingback: 1911 grips
Pingback: mojytfgoigjkfu6diuofhkgu
Pingback: On The Main Page
Pingback: porte in alluminio e vetro
Pingback: ps4
Pingback: Health and Wellness
Pingback: Forestville EC
Pingback: link
Pingback: Ad8989.com
Pingback: Absolutepr.com.sg
Pingback: land Panama
Pingback: 24hr Emergency Roofer Boca Raton
Pingback: carpet cleaning articles
Pingback: Find what you are looking for.
Pingback: ???
Pingback: excellent
Pingback: Air Purifier
Pingback: Pure Garcinia Cambogia
Pingback: Muscle building products
Pingback: resume writing
Pingback: my latest blog post
Pingback: reverse phone lookup by address by phone number
Pingback: Ostomy Supplies Charleston
Pingback: zimske gume zagreb
Pingback: Denver SEO Company
Pingback: dental search engine optimization
Pingback: cedar finance review
Pingback: plastic surgery marketing
Pingback: get rid of google redirect virus
Pingback: Dui Attorney Fort Myers
Pingback: Berita Terkini
Pingback: zobacz wiecej
Pingback: T-shirt printing Singapore
Pingback: Personal Trainer
Pingback: tutaj
Pingback: شات انحراف
Pingback: klik
Pingback: سعودي انحراف
Pingback: شات عسلي الصوتي
Pingback: comment pirater un compte facebook
Pingback: build muscle
Pingback: w tym miejscu
Pingback: Singapore Serviced Office and Virtual Office Provider
Pingback: ptc
Pingback: buy soundcloud follower
Pingback: Sports Blogs
Pingback: Kim Kardashian
Pingback: hochzeitszeitun
Pingback: ve may bay gia re
Pingback: Kim Kardashian video
Pingback: fotobog
Pingback: pozycjonowanie warszawa
Pingback: kwatery szczyrkIpokoje szczyrkInoclegi szczyrkIkwatery prywatne szczyrkIapartament szczyrk
Pingback: Denver SEO
Pingback: netymon newest wp themes
Pingback: www. .net
Pingback: make money online
Pingback: meble na wymiar lodzImeble pod wymair lodzIszafy do zabudowy lodzIuslugi szklarskie lodzIzabudowy kuchenne lodzIzabudowy szklane lodzIkuchnie ludzI meble kuchenne lodzImeble lodzIkuchnie na wymair lodz
Pingback: fashover
Pingback: wedding photographer karachi
Pingback: About peter deeb
Pingback: age discrimination attorney nyc
Pingback: fivesprockets wordpress christmas theme
Pingback: making dubstep software
Pingback: biocompatible dentist
Pingback: holistic dentistry
Pingback: gartendekoration
Pingback: traderush 60 seconds
Pingback: over 50 life insurance
Pingback: Kim Kardashian video
Pingback: Joshua Krentz
Pingback: Pokrov - spiritually religious movement
Pingback: XXX
Pingback: Warez
Pingback: XXX
Pingback: Efren Hinnen
Pingback: sport scores
Pingback: homepage
Pingback: how to stop a puppy biting
Pingback: read more
Pingback: phan mem seo nhanh
Pingback: themelark horizontal wordpress theme
Pingback: skin tag removal
Pingback: hilarious videos
Pingback: view more
Pingback: Kardashian video
Pingback: stream energy reviews
Pingback: Prom DJ
Pingback: funeral programs
Pingback: Adam Onishi