


Canon Debuts 70D: Can it Change the DSLR Auto Focus Game?
Canon recently announced it's latest DSLR, the 70D, which is the...

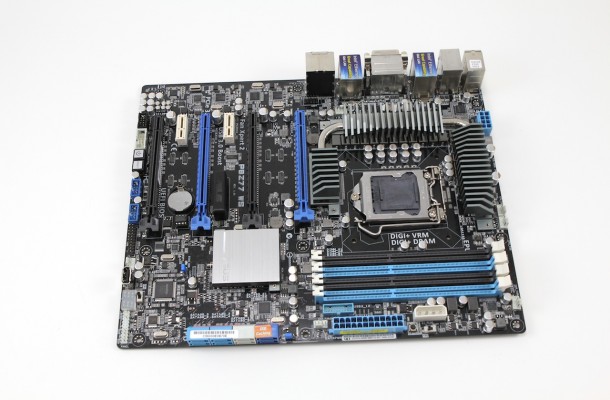
When looking at the P8Z77 WS board we have to say at first glance it really is quite an impressive and yet simplistic looking piece of hardware that yet still catches the eye. Being that this motherboard is geared for the High-End enthusiast and WorkStation environment it is not made essentially for looks, but however to perform in areas that can take advantage and utilize all the power the processors are capable of. There are many areas we could cover so were going to start with some of the more basic features about the board. And move on from there to some of the more advanced aspects of the ASUS P8Z77 WS.

Here is what you get in the package.
As you can see this is a whole load of accessories and a hint as to the capability and compatibility we can expect from the WS model. Once again ASUS does not disappoint in this area and this is important to those who want the ability to take advantage of ALL the board has to offer features wise without having to buy additional parts just to use what you have.

Looking at the board itself you can tell this is a wolf in sheep’s clothing. The color tones and rather mild heatsink profiles is just a mast as to the true potential of this board. First off you see the 4 dual slot spaced PCIe slots which can only mean one thing this board is capable of some very nice GPU configurations and pending they are dual slot cards you can run up to 4 way SLI or CrossfireX setups. Now as many of us have seen ASUS builds some monster GPUs and since many gamers utilize 1-2 cards in most scenarios ASUS took that info and decided to make monster coolers for the cards which come out to a triple slot thickness which in the end means more performance potential and better thermals. One issue this normally raises would be with board fitment since finding two full speed slots spaced appropriately to fit the cards and allow room for them to breathe may be problematic. With the P8Z77 WS the two main slots are 4 slot spaced apart so even if using the 7970 DC2 or the recently released GTX680 TOP DC2 cards you can be assured 2 of them will fit, and even have some space to breathe.

The Storage side of things is really nice as well since the Z77 supports Intel Smart Response Technology right out of the gate you can cache your Standard hard drive to give it a credible performance boost that will give SSD like performance when booting and opening commonly used programs. Now this is not really anything special as every Z77 supports Smart Response, but what is really special is that this board also has the Marvell dual SATA 6G ports which support ASUS SSD Caching. Now before thinking aw man great Marvell you need to understand these are not like some of the first generation Marvell’s which we all saw issues with performance and compatibility. The ASUS SSD Caching is like the Intel Smart Response on steroids! Just for a quick comparison the Intel Smart Response allows for an up to 64GB SSD to be used to cache the hard disk, but with the ASUS SSD Caching we can cache any size SSD we want to our HDD therefore making for the ultimate cached volume with truly no limits. Now one last cool point for the caching is that both can be run concurrently so that your OS can be on the Intel Smart response cached drive while you can run a storage drive of 2TB or whatever size you choose on the Marvell ports with any size SSD to cache it so that not only your boot drive id cached but even your data or game drive. This is the kind of advances were talking about when we mention ASUS giving you the most options and configuration possibilities for your buck!

Memory, oh my memory where has it gone? Oh there it is and its Dual channel and rated up to some ungodly speeds in excess of 2600MHz. Seems like just yesterday memory manufacturers were scrambling to produce units of 2000MHz flavor, then 2133 now were seeing units produced in the 2800MHz range and even higher. It’s all thanks to the Ivy Bridge IMC, which is yet another step forward in capability as we have seen a gradual march forward in speeds jump to an outright sprint for 3K from every manufacturer. The Ivy Bridge IMC should be able to handle 2800MHz DIMMS with not much trouble but do expect that as some are stronger than others overclocking past this point and in excess of 3K will likely be in need of some lower temps for the chip and let’s not forget that the modules will need some love as well if you will be pushing this far. We have been watching many of the well-known overclockers for a bit now and have seen that with some looser timing these ASUS boards can hit memory frequencies well above 3K in some instances. And with some good BBSE modules we have seen some even doing 2800 C7 which is downright amazing but mind you this is with CPU and memory on LN2 so for gaming you will probably be keeping it a lot more tame.

At the upper edge of the board we have some controls reminiscent of the OC station controls we normally see on the ROG boards. Here we don’t have all of the hub bub that we see on the ROG boards such as the Voltage read points and what not and instead it is kept to its WS or “Workstation” roots with some simplistic features. EZ Plug is the White Molex connection which supplies supplemental power to the board which should help ensure a nice stable voltage across the PCB as the entire load will not be on the sometimes tiny 24 pin ATX connector’s wires. Next to the EZ Plus we see the Mem OK button which is nice as it allows a safe default setting to the BIOS to help with a no post condition so that the BIOS can be entered and properly configured. And lastly in this area we have the TPU switch which for anyone not in the know is similar to an auto overclock setting in that by the flip of the switch the system automatically tunes to a performance increase of up to 37% or even better depending upon operating environment and components used.

At the lower edge of the board is a lot of the front panel and basic connectivity options including the Power/reset onboard controls. One thing to note is that if this board is destined to be a 4 way SLI or CrossfireX bench setup switches will need to be connected to the front panel header since the onboard buttons will be covered by the lower most GPU. Accompanying the power/reset switches is a whole host of pin headers such as the COM port, USB and fan headers.

The LCD post indicator is right next to the front panel header and will help with any possible posting issues or concerns. Next to the LCD poster we did find a mainstay of the WS lineup but something many users may not be familiar with. There is a full function USB 2.0 port right on the PCB which allows for either quick thumb drive or USB Wi-Fi access in a bench top configuration or when built in a workstation can even mean a bootable Linux thumb drive can be locked inside the case for the ultimate in connectivity options. I’m sure there is many more usages I am completely leaving out but literally anything can be connected to that port and it really is what I believe is a very overlooked option.

The IO Side offers a pretty beefy connectivity stack by eliminating some of the display options seen on the other board offerings.
This is very good connectivity and being a workstation class board the single display output is about standard as most workstations and server class boards are normally in benches or racks and hooked to a KVM which means only a single display output is necessary. Add to this that with Dual NIC’s this board will handle failover should a NIC ever fail it can just keep chugging along so there is no costly downtime. The USB 3.0 as you see consists of 6 total available ports 4 of which are on the IO with 2 routed from the PCH and 2 routed from the ASMedia controller. The reason the ASMedia controller is still utilized even after the PCH has implemented native USB 3.0 support is that ASUS utilizes the USB 3.0 Boost function which we covered previously in the Maximus V Gene review . To say that the increase in performance from the USB 3.0 is impressive just would not explain how amazing it is.
ASUS P8Z77 WS Advanced Features
One of the things that many forget to mention is that as of recent ASUS has offered the APS service for their Z77 and even X79 models which is a premium Warranty service. This service entitles the user to a speedy advanced replacement so that less time is spent without a board as standard RMA practice is to send the product back and wait for the turnaround of a replacement once the manufacturer receives the board you sent in. To see which boards are supported by default for the APS service check Here

Here is what makes it all possible the PLX PCIe 3.0 multiplex chip. This chip alone is what makes it possible for this and other Z77 boards capable of running 4 way SLI/Crossfire configurations without dropping down to x4 lanes on each slot. The PLX chip adds more lanes so that even fully populated all 4 slots will run at x8 bandwidth which with PCIe 3.0 spec is equivalent to x16 PCIe Gen 2. So all in all this little board could pack some serious punch with the right hardware. Since this is a workstation board figure compute cards will likely find their way into these slots and this is where we will see the true potential.

Server Grade is a word that can get thrown around but what does it really mean? Well when ASUS says server grade this means the WS boards go through the normal desktop testing and validation just for starters then it moves on to the server level validation and testing. This is where things can get very interesting as the Server grade testing includes extreme level component reliability tests, thermal and heat soak testing along with extended operational testing in some of the worst environments imaginable. For anyone who has ever spent a significant amount of time in a server room knows what kind of conditions these servers can face and the 24/7 stress they can be under for many years on end. The Server grade testing does not stop there. Once the components are validated to survive the rigors of workstation usage it moved on to add in validation. This is where many desktop boards can fall short as add in cards such as Raid cards (HBA) or high end fiber/network cards or even really high memory count compute cards can cause hell for the system during post. Many times the system simply cannot properly address the physical needs of the adapters in the addressing space it allocates or has available which becomes even worse as multiple adapters are installed.

What does all of this “Server Grade” testing mean to you? Well let’s start with the most basic part of the equation, compatibility which will be far superior to any other standard desktop board. This means that any card you decide to add to your system should have no issue, no OROM limits or weird compatibility problems as this board is tested with some of the highest usage cards out there. Then we have the durability and reliability testing which is a key factor for someone like me who likes to not only overclock and run my system at its limits but also likes a good gaming session regularly. The components are tested to withstand the rigors of 24/7 server usage which means in my menial attempt at stressing it with gaming the board won’t even break a sweat let alone break down. Believe me servers go through some serious heavy loading and it is consistent whereas anything most users put on it won’t be near that unless of course you are crunching or folding at which then this board is even more perfect for you. The fact that the board has the same overclocking potential as every ASUS Z77 means that this also should be a very capable performer, and with the ability to run 4 way single GPU’s this could actually be an ROG board in disguise.

The DIGI+ VRM for this board is not surprising to see that it is very stout. First off we have the DIGI+ engine which allows for very precise digital control of theVRM components for the ultimate in power delivery to the key components and ensuring that it is fed well. The WS carries an extremely potent 20 Phase power design (16 phase for CPU and 4 Phase for iGPU) and also a dedicated 2 Phase for the DRAM to ensure that no matter the load or overclock there should be plenty of juice on tap. Even though it is a workstation at heart just like many of us it cannot be all work and no play and the WS definitely has some headroom for when it comes time to play or tinker with the capabilities of your rig.

Anti-Surge/ESD protections are yet another technology built into the Z77 series as a whole and something that should add a great amount of comfort for anyone having to maintain many systems as from rack to rack it is easy to build up a charge of several thousand volts which can instantly cause big issues if discharged to a component. ASUS built on special components to absorb such charges and help avoid costly damage and downtime from these mistakes. Now this does not mean that we recommend running across the carpet then shocking your board for fun as this technology is designed to help protect the components but given the wrong conditions ESD can still damage hardware.

USB BIOS flashback is one of those things that once again is taken for granted or not mentioned or understood by many users advanced or otherwise unfortunately. For anyone who has been in the tech field for any significant amount of time the stress of finding a compatible CPU on a new build just to flash the BIOS to support the new CPU you are trying to install was always a huge headache and sometimes would grind progress to a halt. With the introduction of the USB BIOS Flashback by ASUS this all changed, as there is no CPU or even memory needed for the BIOS flash. A thumb drive with the properly named ROM file and a PSU is all that is needed to get the board up to the latest firmware. With the Thumb drive installed in the appropriate port and the press of a button the firmware will be updated and ready to run in a matter of minutes.
A new technology implemented by ASUS on the Z77 boards would be a completely new trace layout for the memory referenced as “T Topology” which is a complete redesign of how the traces run from the DIMM slots to the memory controller (CPU). This allows for more efficient operation and overall better performance and as we have seen from the testing from the professional overclockers some very impressive memory overclocks as well. I do think it’s a little early to see the full benefit from the new topology design and as the extremes are pushed further and further it will become a lot more apparent. Usually complete new layout designs are reserved for the ROG line and eventually trickle down to the other boards but to see a top down redesign like this for every model tells me that ASUS is holding fast to their promise that end users can expect similar overclocking and performance from the most basic model all the way to the top of the stack. This means no matter how much you spend with ASUS you know you’re getting the best performance possible from this board for your dollar and the only performance difference you will likely see will be when going to the extreme benchmarking level or of course comparing feature sets which will make up most of the price difference.
ASUS P8Z77 WS Overclocking
Overclocking the WS was very similar to what we experienced with every other ASUS board in our stack from the GENE to the mITX model. And with the Ivy Bridge CPU your likely going to run out of cooling before you run out of CPU headroom as the new 22nm chips run rather hot and as recent reports have shown this is common among the Ivy Bridge CPU’s.
Figure if you are running a decent quality air cooler you can expect on the high side 4.8 maybe but would be better fit around 4.4-4.6GHz for a steady 24/7 reliable clock on most CPU’s
For higher end water we have been able to do 5GHz stable but temps can creep up into the mid 70’s under heavy consistent load so be cautious and mind the temps if you are going to push for 5GHz or around there.

As you see above on a single stage cooler we were able to push the limits up to 5.5GHz but that was semi stable as the unit is an older model and quickly became overloaded when pushing a fully threaded benchmark. With proper cooling equipment we could see in excess of 6GHz on Liquid nitrogen but that would account for a very small group of users even single stage would be a very small margin but this just goes to show the capability of the platform if you want to push it. Also if the board can handle multiple bench sessions without issue you can expect that under normal gaming conditions with a mild clock will be little to no issue.
ASUS P8Z77 WS BIOS Features
The BIOS of the P8Z77 WS is rather familiar which is great as it shares many characteristics with the ROG models included overclocking settings.

Things start off in the “EZ mode” which is ok for the most basic of settings but to get where we wanted we quickly get into the “Advanced” section. Once in the advance section it drops you right into the main page which give some general board info along with stepping’s and firmware revision. Moving into the Ai Tweaker we are now into the good stuff and this is where the bulk of your time will be spent when tweaking this board.

The Ai Tweaker has many options which lend themselves from the higher end ROG boards but not all of them. The BIOS offers auto overclocking/tuning options but does not carry the performance preset like we had seen on the Maximus V Gene. This is not really an issue as the Ai Overclock Tuner or even the OC Tuner will help with some nice auto overclock settings without much issue. But if looking for the true potential you can just as easily tweak in your own custom settings and likely run the same or better as the automatic overclock and even shave a little off the voltage which will payoff in less heat output.


Everything in the Ai Tweaker menu is well laid out and just where it should be as anyone familiar with ASUS UEFI would have no issue finding the setting they want and also the adjustability is second to none when it comes to present BIOS adjustability. There are an immeasurable amount of voltage, timings and skews available to tweak until you get the setting just where you want them to be. This level of options may seem confusing to many as there are simply so many but many of them are just fine on auto and most basic overclocks can be established with minimal manual adjustments.
ASUS P8Z77 WS Test Setup

ASUS P8Z77 WS Performance Results

ASUS P8Z77 WS Final Thoughts
As I said in the opening paragraph this board may not be the most outlandish or eye candy made motherboard, but it is made to be a stable and efficient SOHO product that brings WorkStation class features to the desktop marketplace and in that area it succeeds well. Most Workstation motherboard also do not overclock like a banshee from hell either as they usually have to deal with locked clock XEON processors that even the new E5 series still maintains. In some ways this board is very unique as not many companies have the backbone to place a WS moniker on a desktop product as their boards simply cannot in reality really perform at that type of level.
Although not stated or advertised as such this motherboard will also make a decent SOHO server for a home business of gaming server for having your own LAN party, which is really the coolest way to have one. Price always being an issue, the ASUS P8Z77 WS does not fall into the WTF it costs how much category as it is priced well within range of similar desktops, just with a different features set. At the end of the day if you are the type of user who wants productivity to be job 1 and need a motherboard that will handle all of your editing and rendering projects and still turn around and play all the latest gaming titles without losing a beat then the P8Z77 WS is something well worth looking into. At the end of the day in the price versus performance ratio ASUS has come up with a winner in the form of the P8Z77 WS making it a solid Editors Choice here on Tech Of Tomorrow.


Canon recently announced it's latest DSLR, the 70D, which is the...


With our initial review of NVIDIA's 760, their latest...


The GeForce GTX 760 Gets Unleashed Another week means yet another launch...

With yesterdays launch of the new GeForce GTX 760, not...
Pingback: szrctgfyfrseshgjgyftre
Pingback: uhnuybytcrdxexcyhbiknub
Pingback: bookmarking sites
Pingback: legal case software
Pingback: bookmarking sites
Pingback: Casino
Pingback: how long does menopause last
Pingback: https://twitter.com/NursenaAkcan
Pingback: e-cigarettes starter kit
Pingback: peter chung eminata
Pingback: Visit Website
Pingback: Buy backlinks services
Pingback: free credit report instantly online
Pingback: work from home
Pingback: cavapoo puppies for sale
Pingback: reliance power nagpur
Pingback: matthew c browndorf
Pingback: DACHPLATTEN FENSTER GARTEN ZAUN
Pingback: earthquake survival kit
Pingback: tv online
Pingback: nlp training courses
Pingback: The Crew
Pingback: Vista Print Coupon Codes
Pingback: Handyvertrag Vergleich
Pingback: enterprise dublin car hire
Pingback: christian louboutin chicago
Pingback: consumer advocate services reviews
Pingback: personal injury lawyer
Pingback: ultimate demon bonus
Pingback: سعودي انحراف
Pingback: Nebenh�hlenchirurgie
Pingback: سعودي كول
Pingback: bizarre news
Pingback: chat english
Pingback: empire of forge
Pingback: she said
Pingback: wicked lasers
Pingback: dobre materace
Pingback: vietnam flower delivery
Pingback: ts
Pingback: The truth about Yelp! advertising click here.
Pingback: gay
Pingback: shit
Pingback: Scholarships for women
Pingback: registry cleaner how to use
Pingback: empower network
Pingback: http://nohyoo.com/story.php?title=arife-aksu
Pingback: mis sold payment protection insurance
Pingback: forklift melbourne
Pingback: karmaloop
Pingback: buy twitter followers
Pingback: bouteille personnalisee
Pingback: see post
Pingback: Buy GooglePlus Ones
Pingback: buy auto insurance online
Pingback: http://www.buyyoutubeviews.pro/reasons-why-google-plus-rules-over-other-social-media-networks/
Pingback: Cheap Mitsubishi Gold Coast
Pingback: bearded dragon facts
Pingback: materace do spania
Pingback: buy twitter followers cheap
Pingback: buy twitter followers
Pingback: http://www.bestcarpetcleaningtampa.info/
Pingback: tham my vien
Pingback: https://www.youtube.com/watch?v=0q-SKmb_QBg
Pingback: fails
Pingback: Erik Schilp
Pingback: imp source
Pingback: Blinds
Pingback: site link
Pingback: http://fullmetalseo2013.org/fullmetalseo2013-neuer-zwischenstand/
Pingback: resume
Pingback: buy 500 facebook likes
Pingback: baju
Pingback: CLICK HERE
Pingback: kabbee
Pingback: http://stilimodi.ru/korotkie-platya-s-pyshnoi-yubkoi.html
Pingback: study in israel for free
Pingback: Fire dancing
Pingback: uhbygtdfcuiygduy
Pingback: Mumsfairy
Pingback: trap beats
Pingback: Tristin
Pingback: Veer.com.sg Singapore
Pingback: Justice
Pingback: Adhocspace.com.sg
Pingback: event management company in malaysia
Pingback: motif 150
Pingback: http://secyourbook.com/blogs/13982/15421/marketing-your-business-with-goo
Pingback: SEO Los Angeles
Pingback: https://twitter.com/nursenaakinn
Pingback: nude chat
Pingback: www
Pingback: http://www.mmshare.net/read_blog/185231/advertising-your-company-with-google-plus
Pingback: trap beats for sale
Pingback: new jersey bail bonds
Pingback: iphone 4S
Pingback: how to lose weight fast - www.youtube.com
Pingback: carpet cleaning news
Pingback: Get GooglePlus Ones
Pingback: finestre in alluminio
Pingback: Wikipedia
Pingback: ps4
Pingback: weight loss suppliments
Pingback: Marques Soares
Pingback: what is 4g
Pingback: The Last Of Us
Pingback: Novita.com.sg
Pingback: kalaskids.com
Pingback: ???
Pingback: usa 411 reverse phone
Pingback: e cig starter kits
Pingback: reverse phone lookup yellow pages free
Pingback: assisted living marketing
Pingback: Cosmetic Dentist
Pingback: Elli Hoppins
Pingback: Cuyahoga Falls Dentist
Pingback: local resume writers
Pingback: Tad Bouck
Pingback: raleigh electricians
Pingback: w tym miejscu
Pingback: klik
Pingback: Agen Bola Ligabet88 Promo Bonus 100% IBCBET SBOBET 368BET
Pingback: Personal Trainer
Pingback: Serviced Office and Virtual Office
Pingback: Sodexho
Pingback: http://www.widoknamorze.org
Pingback: سعودي انحراف 180
Pingback: sprawdz
Pingback: sprawdz
Pingback: corporate gifts singapore
Pingback: klik
Pingback: Marcus warner
Pingback: buy youtube subscriber
Pingback: w tym miejscu
Pingback: T-shirt printing Singapore
Pingback: seo
Pingback: شات عسلي
Pingback: sprawdz
Pingback: hochzeitszeitun
Pingback: fashover
Pingback: The TrendDoll
Pingback: Denver SEO
Pingback: quickbooks hosting
Pingback: Kim Kardashian video
Pingback: ve may bay
Pingback: www.roletyonline.com
Pingback: www. .net
Pingback: trekkingiItramping indieIpodroze egzotyczneIwycieczki dla aktywnych
Pingback: bondsman
Pingback: pozycjonowanie warszawa
Pingback: Technology
Pingback: denver bathroom remodeling
Pingback: how to promote your music
Pingback: bmw parts gold coast
Pingback: Make Money Online
Pingback: fivesprockets thesis theme skin
Pingback: diet pills
Pingback: Protect Buddhist
Pingback: skup aut
Pingback: gartendekoration
Pingback: surfing videos
Pingback: Guadalupe Palomarez
Pingback: Kim Kardashian tape
Pingback: Viagra
Pingback: free dating sites for men
Pingback: Porn
Pingback: KimK
Pingback: Carley Martiny
Pingback: junge sexcams
Pingback: biocompatible dentistry
Pingback: Pokrov - spiritually religious movement
Pingback: Free Dating sites
Pingback: Internet Marketing
Pingback: rolex milgauss replica
Pingback: Kim Kardashian tape
Pingback: puppy biting
Pingback: click here
Pingback: check it out
Pingback: unlimited hosting
Pingback: reputation management
Pingback: read more
Pingback: themelark be social wordpress theme
Pingback: Metlife Insurance
Pingback: oferta naszej firmy
Pingback: fabescorts.com
Pingback: facebook make money
Pingback: view more
Pingback: Dance Floor Hire
Pingback: Reputation management Firm
Pingback: funeral programs
Pingback: stream energy reviews
Pingback: funeral programs